Blocking Filters
There are situations in real life which we would prefer, in the context of video security, to configure as events or even as alarms. Equally, there are situations in which we would like to disable precisely these events or alarm configurations, at least for certain periods of time. Blocking filters are suitable for just this purpose.
How to add a blocking filter:
-
Right click the Blocking filter list and then click Add or click the
 icon in the toolbar. The filter is added to the list. Each filter has three configuration entries: Activate by, Deactivate by, and Filter actions.
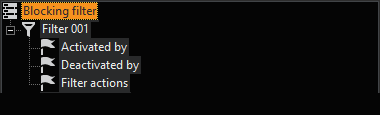
-
Right-click on one of the entries to open the Actions pop-up dialog window.
-
Click on the desired action to add it to the selected entry.
-
Select the added action and configure the action parameters in the setup area.
How to copy an action from PLC simulator:
You can also copy actions and the associated parameters from the PLC simulator and paste them directly into G-Set.
-
In the PLC simulator, copy the action string.
-
In G-Set, select the respective filter entry, e.g. Activated by, and paste the action from the clipboard. The associated parameters are added to the filter entry.
You can also add several actions and their respective parameters at once. To do this, paste the action strings from the PLC simulator into a text file and then copy all the actions strings from this file to the clipboard.
Examples:
The following examples describe the possible value of such blocking filters.
Example The connecting corridor in an office building is monitored at night by AD. The night watchman also makes an hourly round. Either these rounds will be reported by the AD as alarms, or it will be necessary to temporarily disable the AD each time. Neither of these is in fact reasonable.
The problem can quickly and easily be solved with the aid of two keyswitches (digital contacts) and the configuration of a blocking filter. The watchman operates the first keyswitch before he enters the corridor, and the second after he leaves the corridor. The configuration of the blocking filter is as follows: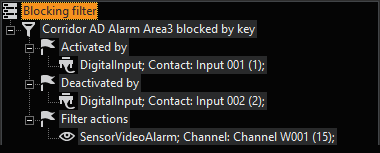
The blocking filter is given a meaningful name, and is triggered by operation of the first digital contact (keyswitch). This blocks the sensor alarm in Area 3. The block is cancelled by operating keyswitch 2 at the other end of the corridor.
The relevant actions are loaded by a right mouse-click on the configuration facilities, and then on Add.
Example In our second example, all the video sensor alarms of the AD (in Area 3) and the VMD (Chain 3) are blocked on a Saturday during business hours. The block depends on a change in the time range.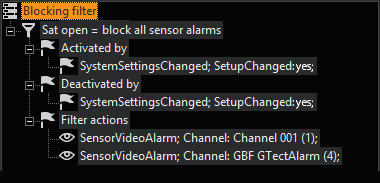
The blocking of all the AD and VMD alarms is activated by the change in time range: In this case, from Rest of Time to the Weekend 001 time range. The block is cleared when the time range changes from Weekend 001 to another time range.
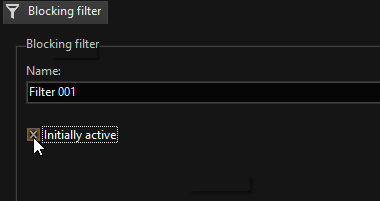
Initially Active
There is a special feature in the configuration of blocking filters: Initially active.
If this field is marked, the blocking filter is activated when
- the filter has just been created and the configuration sent to the server.
- the G-Core server is started.
Do not confuse this property with the normal activation or deactivation of the filter!