Event/Alarm Wizard
The Event/Alarm wizards guides you in 5 steps through the creation of alarms and events, which are used to control actions and the recording of events and alarms. A feature of the wizard allows you to create multiple events/alarms simultaneously and assign them corresponding actions.
You can also create, edit and delete events and alarms using the Events dialog. General information about the configuration of events and alarms can be found in the help pages for the Event dialog.
To open the Event/Alarm wizard click either on the Event/Alarm wizard button on the G-Set home page or use the  button next to the sidebar topic Events/ Behavior rules. A network connection to a server is needed for opening. See how to build a server connection with the Connection Wizard.
After opening the Event/Alarm wizard, the first step Event settings will open. You will see three areas:

|
|
Area |
Description |
|---|---|---|
|
|
In the General Information area, you can create a new event by assigning it a name and optionally a description. |
|
|
|
In the Time ranges, you can configure the time range of the event. |
|
|
|
In the Event configuration area, you can configure the event. |
General Information
In the General Information area, a new event can be created by assigning it a name and optionally a description.
In addition events can be combined to form event groups. To assign the created event to an event group select an event group under Event groups or create a new event group by clicking the button.
Times Ranges
The Time ranges area allows you to configure the time range of your event. If the event should be stopped, if the configured time range is passed, activate the slider under Stop when leave valid time range.
Choose the time range for your event by selecting one of the time ranges in the list off All time ranges on the left side of the Time ranges area and use drag and drop to add a time range to the Times ranges box.
If you have not yet defined any time ranges, the default value Rest of Time is available. Rest of Time is a special time range that is only used when no time ranges have been defined or when no other time range is valid. Because Rest of Time represents different time ranges depending on the configuration, this time range is not configured, it is a "virtual" time range.
More information about time ranges and how to define and configure them can be found under Time Ranges.
Event Configuration
With the Event configuration area the newly created event can be configured.
At first you can specify the Event run time of the event, by activating the Event run time slider. If the slider is activated you can set the event run time in seconds below using the arrow keys.
Afterwards choose a Ring buffer and an Archive level for recording. You can use one of the default archive levels or may specify your own archive levels for each ring.
|
Default archive level |
Recording time |
|---|---|
|
Level 1 |
15 Days |
|
Level 2 |
30 Days |
|
Level 3 |
45 Days |
After you have selected a ring buffer and an archive level, use Retrigger to define how your event should react when it is retriggered during an existing activation. The four trigger modes are available:
|
Trigger mode |
Function |
|---|---|
|
Start new instance |
Starts a new instance. |
|
Ignore action |
All set actions are ignored. |
|
Retrigger |
The event is retriggered. This means that the event configuration runs again. |
|
Order dependent |
The event settings run in the order of configuration. |
More on ring storage, archive levels and dynamic management of the database can be found here.
If recording of the events prehistory is needed, the time range of the prehistory in seconds can be configured under Event history. When activating the prehistory by specifying a time range, the Link prehistory range to event slider appears. Activating the slider the events prehistory can be bind to the event.
Now, only the settings for distributing the event are missing.
To store the event to the database activate the slider Store event to database and choose in witch case the event should be stored. If the
|
Slider |
Function |
|
|---|---|---|
|
Store event to database |
Send to client |
|
|
Store event to database |
Saves the event in the database. |
|
|
On start |
At the beginning of the event. |
At the start |
|
On stop |
At the end of the event. |
At the stop |
|
On retrigger |
When retriggering |
When triggering |
|
On additional data |
|
|
When all settings have been made go to the next step by clicking on Next.
In the second step, you specify through which action the event is to be started or stopped . On the right there is a list of all actions ![]() to use for this purpose.
to use for this purpose.
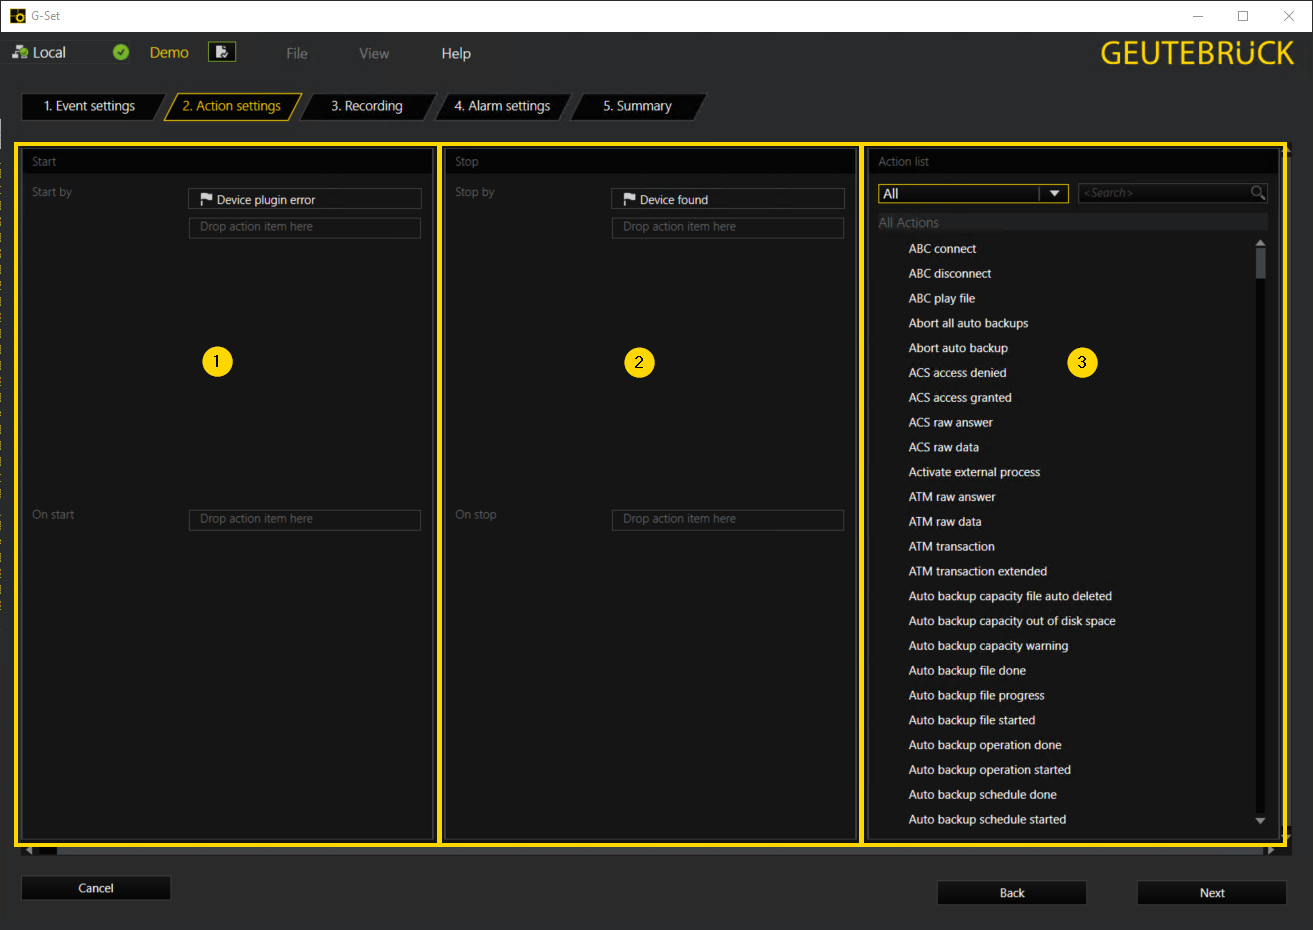
By default, all actions are displayed in the actions list ![]() . By clicking the small down arrow in the action list area and choosing one of the displayed action groups all actions of the action group will be displayed in the action list. Alternatively, you can enter an action name, or part of an action name, in the search box. Matching actions will then be displayed.
. By clicking the small down arrow in the action list area and choosing one of the displayed action groups all actions of the action group will be displayed in the action list. Alternatively, you can enter an action name, or part of an action name, in the search box. Matching actions will then be displayed.
Once you found the desired action, drag it with the left mouse button onto one of the drop item here fields in the Start ![]() or Stop
or Stop ![]() area. You can highlight multiple actions simultaneously. To do so, hold down the Control key and select the desired actions with the mouse.
area. You can highlight multiple actions simultaneously. To do so, hold down the Control key and select the desired actions with the mouse.
The next setting step is the Recording.
Recording Settings
In the Recording settings dialog you can configure the desired run-time settings for the event. Choose between:
- Don't change event run time (Default value)
- Override event run time
- Disable event run time
Recording Channels
Under Recording channels you assign the associated media channel(s) to the event. To do so, select one or more channels from the list of channels (similar to above for the actions) and drag them onto the drop item here field.
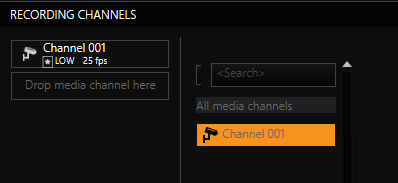
The selected recording channels are displayed with values of the quality setting and the frame rate.
If you right click the recording channel, a small selection menu opens, allowing you to delete the channel by clicking on the ![]() icon or to edit the channel settings by clicking on the
icon or to edit the channel settings by clicking on the  icon.
icon.
The edit icon will open the following channel settings pop up window.
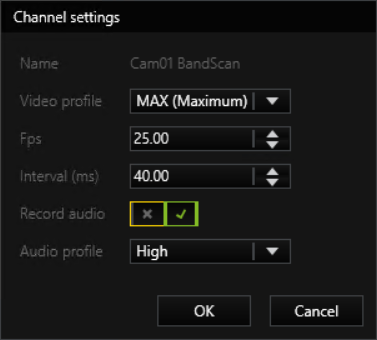
Click OK to accept the changes and close the pop up window.
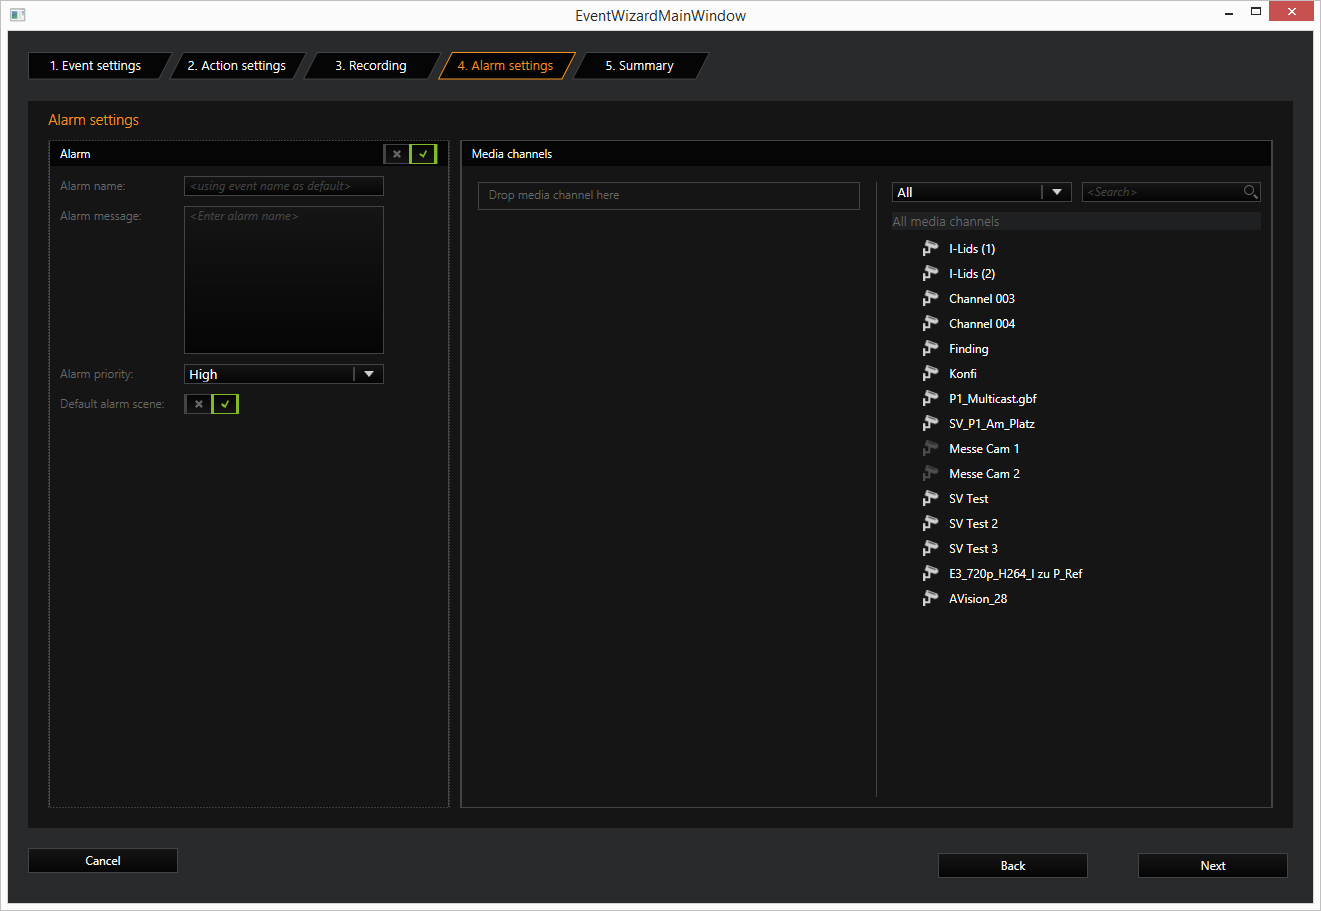
In the Alarm settings step you can set and configure alarms. Activate alarm settings by using the slider next to Alarm. The following areas will appear:
On the left side the Alarm area where Alarms, including their names, message and priority can be configured and on the right side the Media channels area where media channels can be added to the alarm.
Alarm
Configure an alarm by giving it a name. Enter a text that should be used in case of an alarm, in the Alarm message box.
Under Alarm priority the desired priority can be assigned to the alarm and by activating the slider next to Default alarm scene you assign the default alarm scene to the alarm. Alternatively disable the slider and enter a alarm scene under Alarm scene.
Media Channels
Under Media channels, you add one (or more) media channel(s) to the alarm in the same manner as for the recording settings. The settings of the selected channel are displayed and can be edited by right clicking on the media channel.
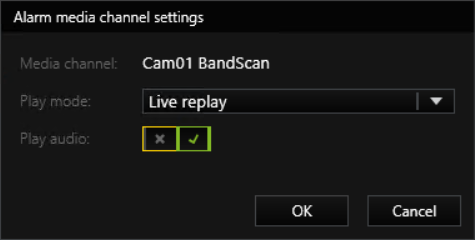
To accept your setting changes, click OK.
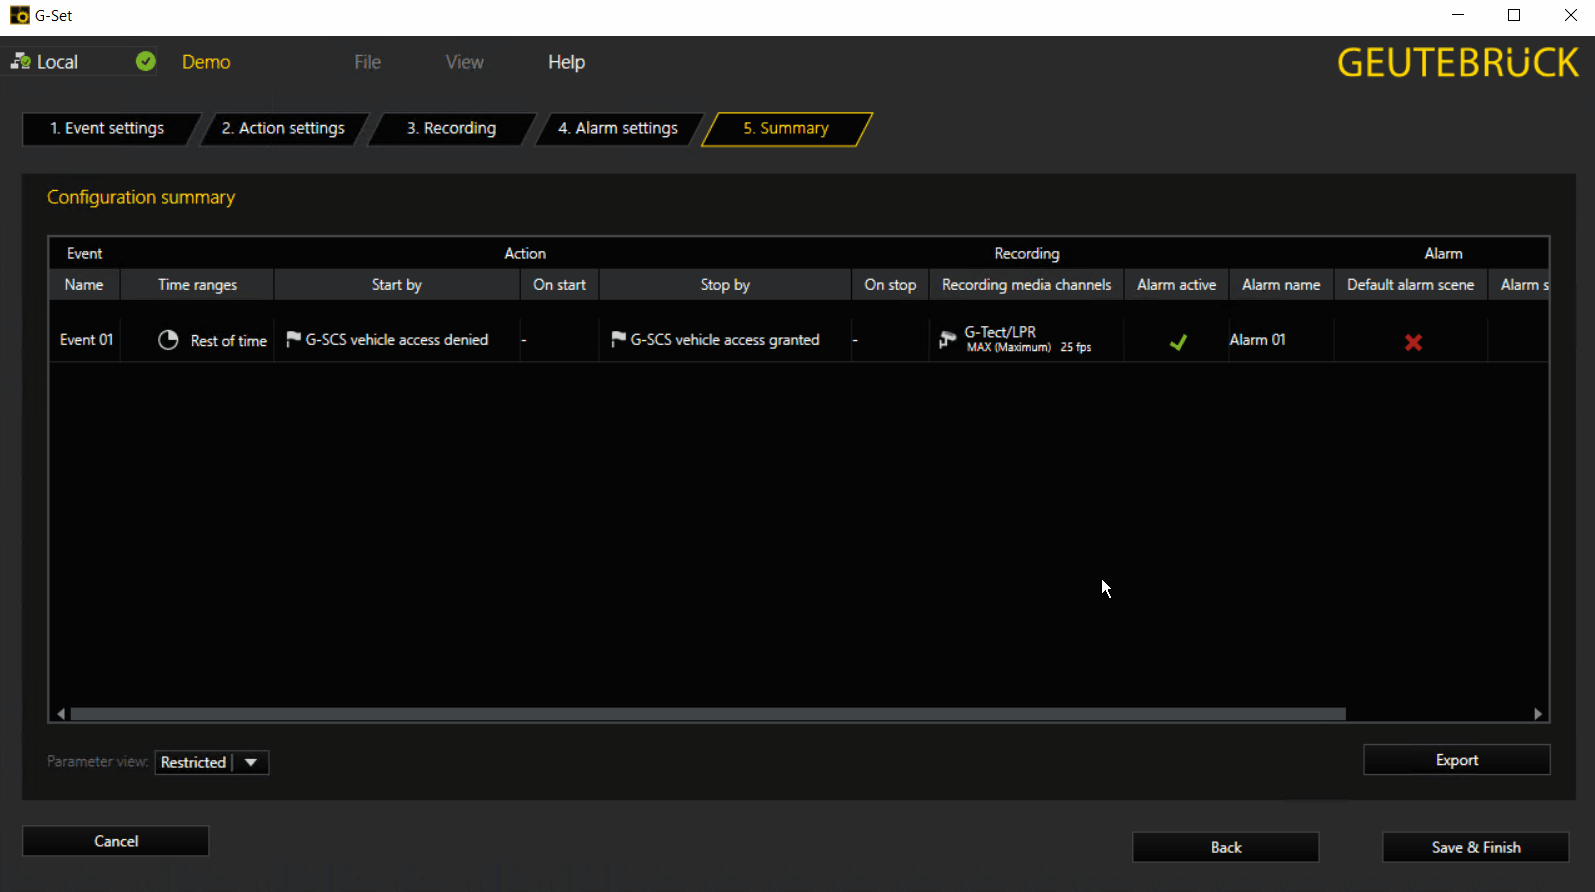
The Summary shows all the configurations that were added with the Event/Alarm wizard.
Below the summary tabular list you will find the two buttons: Parameter view and Export.
The Parameter view default setting is Restricted. In this mode, only the most important settings are displayed in the summary. You can display all taken settings by setting the Parameter view to All.
The Export button opens a dialog with which you can export and save the summary table according to the setting in Parameter view as an Excel file (*.xlsx).
In the Summary you cannot make any changes to the configuration!
If you click one row in the table, the selected row is highlighted. This makes it easier to read related settings for the selected event in particular when the Parameter view is set to All.
You can simply specify which columns are displayed in the table view. To do this, right-click anywhere in the table. A pop-up window opens in which you can specify which columns will be shown.
Example
When you click Save & Finish the settings are written to the local setup and the wizard is closed. The event configuration is now available in G-Set for further processing.
The configuration is immediately sent to the server by clicking on  .
.